Thursday, December 17, 2009

Inertia Switch


This switch will shut-off the keyed switch power to the main contactor in the event of a collision. It is odd to plan for events that you hope will never happen.

Tuesday, December 15, 2009

EV Dashboard is Open Source

I've setup EV Dashboard as an Open Source project on Codeplex. There are still a couple of open issues I'll have to fix but the beta version is available to download. The Paktrakr implementation is working and a placeholder for the Elithion BMS and Xantrex Link-10 have been created.

Tuesday, December 8, 2009

New controller & single cell charger

Kelly Controls sent a new KDH15600B, which is 11" long compared to the 7" KDH14401A. It fits into the same spot as the smaller model with only one new cable needed. Notice the paktrakr resting there. I'm waiting for an extension cable to run from the last remote in the trunk. Then I'll strap the remotes and display in a permanent location.


Single Cell Charger
After the initial charge to the TS cells and they rested the voltages were all between 3.32V and 3.36, which is pretty good. I bought a single cell LiFePo4 6A charger to manually balance the cells in the interim before I can find an inexpensive and adequate BMS. The single charger has a 3.8V cut-off and each cell charged for 1-2 hours then after rest the cells are all at 3.50V. The weather was a little colder the past few days, -5F and the garage was cold too and each cell appeared to dip a little to 3.48V. I expect when they warm up they might come back to 3.5V.

According to the ThunderSky charging curve 3.8V is 75% charged and the remaining part of the charge curve is at 4.2V with a tapering current for about 30-90 minutes. So, I'm not sure that shunt style BMS that limits part of the current to 3.8V is appropriate unless it can "release" all the cells once they are balanced to finish the charging cycle.


Monday, December 7, 2009

EEStor and Zenn

A recent Zenn press release has EEStor listed as the technology behind Zennergy. At the Zennergy site, EESU (Electrical Energy Storage Unit) is an Ultracapacitor storage device with about a third the weight of Li-ion, no over discharge degradation and 1/10th the charge time ("minutes").

Monday, November 30, 2009

China and EV myths

This China_Fact_Sheet_Electric_Vehicles fact sheet from the White House is pretty encouraging for the future of EVs. Specificially the paragraph about "Public Awareness and Engagement", which I think, is the biggest hurdle. Over the past year I've talked to alot of folks with unfounded preconceived ideas about EVs. These are the best ones.

Myths:
  1. "The range of an EV isn't enough for most people." An LEED builder
  2. "The electric grid can't handle electric vehicles." A mechanic
  3. "Electricity generated from coal pollutes as much as gasoline." A british friend
  4. "Ethanol is the worst environmentally." A energy think tank "expert"
  5. "We won't have electric cars anytime soon." The same think tank guy
  6. "We don't all need an electric car like Al Gore says." A Montana house representative
  7. "If we don't use gas then we won't have taxes for roads." A local builder

Wednesday, November 25, 2009

EV Dashboard

EV Dashboard is a Windows Mobile application that also runs on a Windows CE 5.0 based dash mounted GPS device like the one below.

This is a GPS touchscreen from dealextreme.com. Notice the catchy phrase on the side. It also says "Very Good Very Powerful" across the top.


After finding the time over a couple weeks to connect the Paktrakr up to the TS cells I was able to get the EV Dashboard connected. There were only a few differences between my test data and the live data from the Paktrakr so I only had a few tweaks to the display. I'll mount it in the car next.

It is pretty easy to see that cell 7 on Remote 4 is under charged. (I haven't activated the cells yet). There are 45 cells (20 in the trunk and 25 up front) and Remote 3 has only 5 cells on it and is split with 4 in the back and 1 under the hood. This required a single wire strung back to the remote in the trunk. Also, the remote's lead is not quite long enough so Ken Hall from Paktrakr is making an extension.

Here is the setup tab. You can select the battery type, select logging to the SD card and run back your data in simulation mode.


Contact me if you are interested in using the EV Dashboard. I'll can just send you the beta bits. Also let me know if you can build a low power bluetooth serial cable for the Paktrakr. That would save some power and $ for the IOGEAR Serial to Bluetooth adapter and DC adapter and it would be a more elegant solution. This previous post has some setup details.

Thursday, November 19, 2009

Activating Thundersky LFP

Thundersky LFP cells require an "activation" charge cycle before discharging. James from evcomponents said "The max is 4.25 V Although you should only do that the first time for activation. After that 3.8 V should be the max. ".

The Thundersky "quality certificate" says:

"The electricity is half loaded when the batery produced, the battery cannot be discharged directly under any condition, and must be charged before first use. Please check and if the voltage is 4.2v means the battery is fully charged. If the battery is used in series there must be professional technicians to handle and required charger and BMS must be attached in use."

Then in a separate print out it says:

"Warning
Before first discharge the battery, please charge it to 4.2V with the constant current of 0.1CA~0.5CA and stop until the charging current falls to 1% of the original."


So, I have the Manzanita Charger set to 191V as the cutoff for 45 cells at 4.25 each. Below is a graph of the paktrakr data from the charging cycle for 8+ hours. The amps are X10 to fit on the same scale as volts. The small blip before the "hockey stick" is when I turned off the charger to go to bed and restarted it in the morning. The charger started tapering the amps at 191V and then the voltage dropped. I set the amps to 10A manually and then adjusted again at the end to 1A.


Wednesday, November 18, 2009

Snow Driving

We took the del Sol out for a drive today. All-in-all very good but the acceleration was very choppy and slow and after about 5 minutes at about 40 MPH the controller cut out. I pulled over and it wasn't hot to the touch. I've been warned about overheating with the Kelly KDH but it isn't a hot day (see the pictures below and notice the snow). I'm more than a little concerned that the Kelly controller is both underpowered and easily overheated.


It took 5 attempts to get up the drive way between the choppy startup and the summer tires on the slick snow. Since the car came with studded snow tires I'll have to put them on soon.


After contacting Kelly Controlls customer service they said the KDH14401A (144V/400A w/ Regen) was underpowered for the vehicle. They recommended an upgrade to the KDH15600B (156V/600A). The A models are 7" while the B models are 11" and the web site says the B's are a newer design. I'm hoping that will take care of this problem.

Saturday, November 14, 2009

Tachometer


I've decided to get the original Tachometer in the dashboard working. I've saved the blue (BLU) wire on the wiring harness, that ran from the distributor to the junction connector C415, to connect to a hall-effect sensor and 2 magnets on the motor auxiliary shaft. Thanks to Brian's work at S2KEV the tach signal should need 2 12v pulses per revolution of the motor. This coincides with 2 spark plug ignitions per revolution for a 4 cylinder car.

The gauge goes to 8000 RPM so the FB1-4001A should register on the gauge well. I've got 2 magnets to JB weld to a 3/4" shaft collar for the auxilliary end of the motor, a bolt to mount the Melexis sensor, 2 nuts to adjust the sensor and an angle bracket to mount the bolt on the motor mount instead of on the motor directly. They told me I was reinventing the wheel at Ace. We'll see.


I used an old 4 wire plug from an old computer and only used 3 of the sockets. The parallax site has recommended cables and magnets to go with the sensor. Another option for the hall-effect sensor is this Honeywell SR13C-A1 which is pre-mounted and wired in a plastic snap case. I ended up using this one with a metal strap bent into position.

Well, my first try didn't work. There was almost no voltage on the output when a magnet passed by the sensor. But after I dug a little bit into it the wiring diagram they recommended sensor circuit have a pull-up resistor between the Supply (12v) and Output (tach wire). I tried out the resistor with my son's Circuit Jr. kit and it worked so after putting in a 4k ohm resistor the tach works. With the car on jacks and in 1st gear I was getting about 2000 RPMs for 10 MPH.


Here is the sensor mounted to an L bracket on the motor mount on the auxilliary end of the motor. I've re-crimped the ends with the resistor and wrapped it in heat shrink to keep it clean.


Thursday, November 12, 2009

More snow and the next EV

It is snowing. And snowing. We already have about 2 feet and counting. I'm pretty sure that the del Sol won't make it through the deep stuff. So even before it is finished I'm thinking that the next EV will have to be a AWD, maybe an older Honda Civic Wagon AWD. Here is our alley this morning with a garbage truck stuck in the snow. You don't see that everyday.


Thursday, October 29, 2009

Last Cables


Running 2/0 cable from the 20 cells in the trunk with plastic cable wrap and plastic straps. Using self drilling screws made it easier to mount the straps but it was still the toughest day on the car yet. The Paktrakr and BMS wiring will have to go on the outside of the plastic wrap with zip ties. This is the home stretch with only wiring the cells together remaining.


Below is a picture of the cables in the trunk under the battery racks.


Steve drove by in his Solar Bug to return a cable crimper.

Monday, October 26, 2009

Cell connectors

The TS cells came with connectors from cell to cell but the connection between each pack of 5 is about 1/2" wider so I made 3 connectors from 5/8" thin walled copper pipe, flattened, drilled and wrapped in heat shrink. They aren't as pretty but should work just fine.

Sunday, October 25, 2009

Vacuum brake pump

This vacuum system is from evsource, which claims it is quiet. I found a good place for the pump and tank and hooked it up. The instructions are very good. It ran for about 40 seconds, was super loud, and then shut off because the vacuum had been reached. So far so good. Then when I hit the brake pedal it turned on again and didn't shut off. Something is wrong. I had to disconnect it from the battery to get it to stop running. They are sending me a new system. Hopefully that will work.

The noise might be a big problem. This pump is rated at 72 db. There is a pump at metricmind.com that is rated at 50db, which might be the ticket.

Saturday, October 24, 2009

EV Dashboard

I've written a Windows CE app, which will also run on a Windows Mobile 5 and 6 device, to display data from the Paktrakr. It reads the data from a bluetooth adapter on the serial cable. I've got it running on a dashboard mounted GPS. On the main tab it displays amps, volts, temp, soc% and kWh. And on the second tab it has a bar chart of the batteries or cells with voltages. It has a simulation mode and can log data to the SD card.

Display:
I found a cheap 5" GPS display running Windows CE 5.0 Core with Bluetooth that can run apps. http://www.dealextreme.com/details.dx/sku.22067 It includes a bracket to mount on the dashboard.
The application should also run on any Windows CE 5.0 Core device with bluetooth including the Magellan Maestro 4250 and the Mio C520. These devices may, however, require renaming some of the installed files.

USB:
There is only one USB port on this type of device and it doesn't provide power. So it can't power a serial to USB adapter. Even more, because of limited battery on the device the USB is needed for charging. Perhaps there is a USB splitter that would charge from one side and communicate from the other, but I couldn't find one.

Bluetooth:
The device doesn't have pairing software for remote bluetooth devices so I had to discover devices and open a stream to the bluetooth device directly instead of through a virtual COM port. I used a IOGEAR Serial to Bluetooth adapter that has an AC power cable (output is 5V and .35A). To get it to work on the Paktrakr serial cable. Hopefully I can find a car adapter to fit it. Then I had to solder a wire between pin4 and pin7 on the 9pin serial cable coming from the paktrakr.
While this wasn't an ideal solution it does work.


Better Bluetooth Cable:
I ordered a couple bluetooth usb dongles from Amazon for 99 cents each. They run the Broadcom 2045 chipset which has very low power requirements. So, I believe it wouldn't be too hard or expensive to build a cable from Paktrakr. I'll be looking for some help with this since it is out of my comfort zone.


GPS:
Microsoft has a GPS Intermediate Driver (GPSID) that is available on Windows Mobile 5 and later. This allows multiple apps to share the GPS hardware. This GPS device doesn't ship with GPSID and I can't find a way to set it up. So, watthour/mile will have to wait for the "advanced" version.

Friday, October 23, 2009

Tesla paper

The 21st Century Electric Car is a white paper by Tesla Motors. It basically shows that electric drive is more efficient and less poluting than any other drive, including NG, Hydrogen, Diesel, Gasoline, and Hybrid.

Thursday, October 22, 2009

Rack changes

Here are some late changes to the firewall battery rack. A friend is a blacksmith and welded on a couple straps for me today. No plywood is needed and I feel better about how the cell will rest in the trays now so I'll start wiring together the pack soon!


Wednesday, October 21, 2009

Batteries Home

Well, they finally arrived! My original order for 45 100Ah Thundersky LiFePo4 cells was placed with evcomponents in June. While I was told they would be here mid August, I just got them last week (end of October). I've got 20 cells in the trunk, and 25 under the hood. The dimensions are actually what is listed in the specs so the racks are just about right. The connections on top of the cells will be about a half inch higher but I've reserved room for those. Also, the there is room for the vacuum pump and tank, bonus!


Straps will hold them in place.


Motor mount revisited


With the batteries here and the charger on the way it was time to finish the motor mount. I trimmed off the top edges, drilled a couple of holes for the tachometer sensor and painted it.

Monday, September 28, 2009

Hours

How much time does an EV conversion take? I've tracked the hours below with my previous project's hours in parenthesis. This project has gone much quicker but includes a few more things like the wiring harness, tachometer, BMS, etc. Building the adapter plate took much more time in the last project. Since I still have to install the brake pump, charger, BMS, Batteries and tachometer the numbers are estimates.
  • Prep 35 hours (30)
  • Motor Mount 18 hours (50)
  • Low voltage Wiring 30 hours est. (20)
  • Cables and racks 41 hours (30)
  • Misc. Paint & Clean-up 10 hours est. (20)
  • Total 135 hours (150)

Saturday, September 26, 2009

Firewall rack

This rack will hold 3 of sets of Li cells. Since I left the original aux. battery it couldn't be exactly like Tim's racks but is close, 12"x37". I've extended the front with 3 10" pieces of angle, 1 1/2"x1/8". They will hold the control box, controller and charger. I won't need a sheet of plastic or plywood because of the box containing the fuse, cut-off switch, contactor, and wiring terminal.


Left side.


Right side.


Sunday, September 20, 2009

Front rack

This rack will hold 2 of the 5 cell packs and is mounted very similarly to Tim's front rack except it is a welded box 35.5" x 7". I've only mounted it to the top single bolt on the "towing" mount of the frame. The straps coming down are 3/4" x 1/8" and bolted to the rack with 1/4" bolts. Instead of powder coating I used a propane torch to burn off the oils and moisture and then primed and painted.
Left side.

Right side.

Saturday, September 19, 2009

Rear rack

The rear rack is 30" x 12" and will hold 4 of the 5 cell blocks. The tube is 14.5 inches but because of the frame under the trunk, the whole rack had to be mounted 1.5" from the forward wall of the trunk. If the tube was 16" it would have been a better fit. The holes and bolts are 3/8".


Wednesday, September 16, 2009

Battery Racks


I've ordered 45 Thundersky 100 Ah cells from Dave at evcomponents in Issaquah, WA. They are supposed to be here any day so I've got to get the racks installed. The cells are 145mm X 220mm X 68mm or 5.7" X 8.66" X 2.6". The are already prestrapped in groups of 5 (5.7" X 13.85" X 8.66"). I'll put 2 in the front rack, 3 in the firewall rack and 4 in the trunk. They are 7.7 lbs. each so the weights should be similar to the ICE parts removed from the car. I cut the pieces and had a friend weld them together. I'll follow the installation advice and instructions from Tim Kutscha, with a few changes. I'm not bolting the racks but welding them at 45 degree angles. Since the dimensions of my batteries are thinner the racks will be narrower. Also, the del Sol trunk appears to be a different shape than the Civic. I'll just prime and paint the racks instead of powdercoating them. Here is a picture of the welded racks.


Wednesday, September 2, 2009

Vantage Green Truck

Ron let me drive his Vantage Green Truck last week. Very nice. It has smooth acceleration, nice interior, and a flashing light on the top! The display is very small and the regen is pretty agressive so it slows down quickly.

Friday, August 7, 2009

Floor mats

While these del Sol floor mats I found on ebay are really faded, they are still pretty cool.

Tuesday, August 4, 2009

Throttle (me)


So, I had the throttle wires connected to the micro switch on the front of the potbox. As you can see from the picture (I got lucky) and there is a 3rd post on the throttle. With some internet reading I connected the 5V input to the unused 3rd wire and grounded the 1st wire (white) and the middle (wiper or black wire) is the throttle input. Now the throttle and gas pedal work correctly.

Note: At this point in the conversion I cannot recommend a Kelly KDH for the simple reason they don't support 0-5K throttle input.


Batteries

Several new things have happened with batteries in the past 9 months. The price of Lifepo4 cells has dropped from about $250/100 Ah to $120/100 Ah and there are a few importers who are offering that price, including evcomponents.com and jungle motors.

Perhaps the biggest indicator is that LG Chem and its US division, Compact Power Inc (CPI), will supply the batteries for the Chevy Volt. They plan to spend $800M on a Korean factory. Also, A123 will supply the batteries for Chrysler and Kia and Nissan Leaf (with NEC) have announced EVs.

A quote from an article about the Leaf:

"However, the battery, the most expensive component on the car, will only be leased to customers.

The Leaf is powered by laminated compact lithium-ion batteries, which generate power output of over 90 kW, while its electric motor delivers 80 kW/280 Nm."

Friday, July 24, 2009

Maiden voyage

With a couple batteries tied to the radiator mounts I was able to drive up and down the driveway a few times before the batteries got weak. Like I said, the throttle is really jumpy and there is a wobble in the motor front plate, which I'm affraid might be serious. The next step is to get the battery racks built and installed and string some cables to the trunk.

Kelly controller error

I had a few set backs today. I first got the 2,4 error "Throttle signal is higher than configured dead zone at power-on." I had the ground and 0-5v output reversed. Then I got the error 2,2 or "Internal Voltage Error", which says "The controller is damaged". I guess I got a bad one.

Later: It turns out I had the potentiometer wired wrong. The 5v goes to the COM (left), Ground to the N.O. (middle), and the 0-5V throttle to N.C. (right). It works now. The throttle is very quick and the car lurches forward or back, not sure what that is.


Wednesday, July 22, 2009

Solar Bug

Steve Titus lent me a couple batteries for testing. Here he is standing next to his Solar Bug. It is a 72v EV with a solar panel on the top. With 3-4 amps from the PV panel he should be able to get 10-15 miles per day from the sun!

Saturday, July 18, 2009

Makin' cables

With the control box in place and the low voltage wiring ready, now time for the high voltage cables. The orange ultraflex cable is much easier to work with in tight spaces, like the control box, than the black but it is twice as expensive. In this picture is the Noalox anticorrosion gel and the hammer crimper. I've found pounding with a hammer on the cement floor give the best results.

Friday, July 17, 2009

Temperature sender

This is the original temp sender from the engine. It is a thermistor or temperature resistor connected to the temp gauge on the dashboard. When the temp goes up the resistance goes down. I'm mounting it to the controller to monitor the temp from the drivers seat. The controller operates up to 90C (195F) and will shutdown at 100C (212F). This corresponds to a typical 195F thermostat in a car so the gauge should read about halfway when the controller gets hot.


Control box mounted


There was a mounting bracket already in the engine bay and a 6" angle bracket from Ace fit perfectly to one of the screw holes for the clutch, which is gone. The mount is bomber and the hood even closes, which is a plus. Also, there is room for battery racks in front and behind. The controller is Kelly 144v with regen from cloudelectric for $875.


The Kelly KDH requires a 5V input instead of just the 5ohm input from the existing potbox wires. So, wiring the 5V output from the controller into the potbox, plus the ground and the 5V output of the potbox.


Sorry I'm so color blind with my wiring. The yellow-black wire should be black (gnd) and the blue wire (from the throttle's black wire "signal") should be green. I've used yellow for 5V from the controller to the throttle.

Wednesday, July 15, 2009

Control box and controller

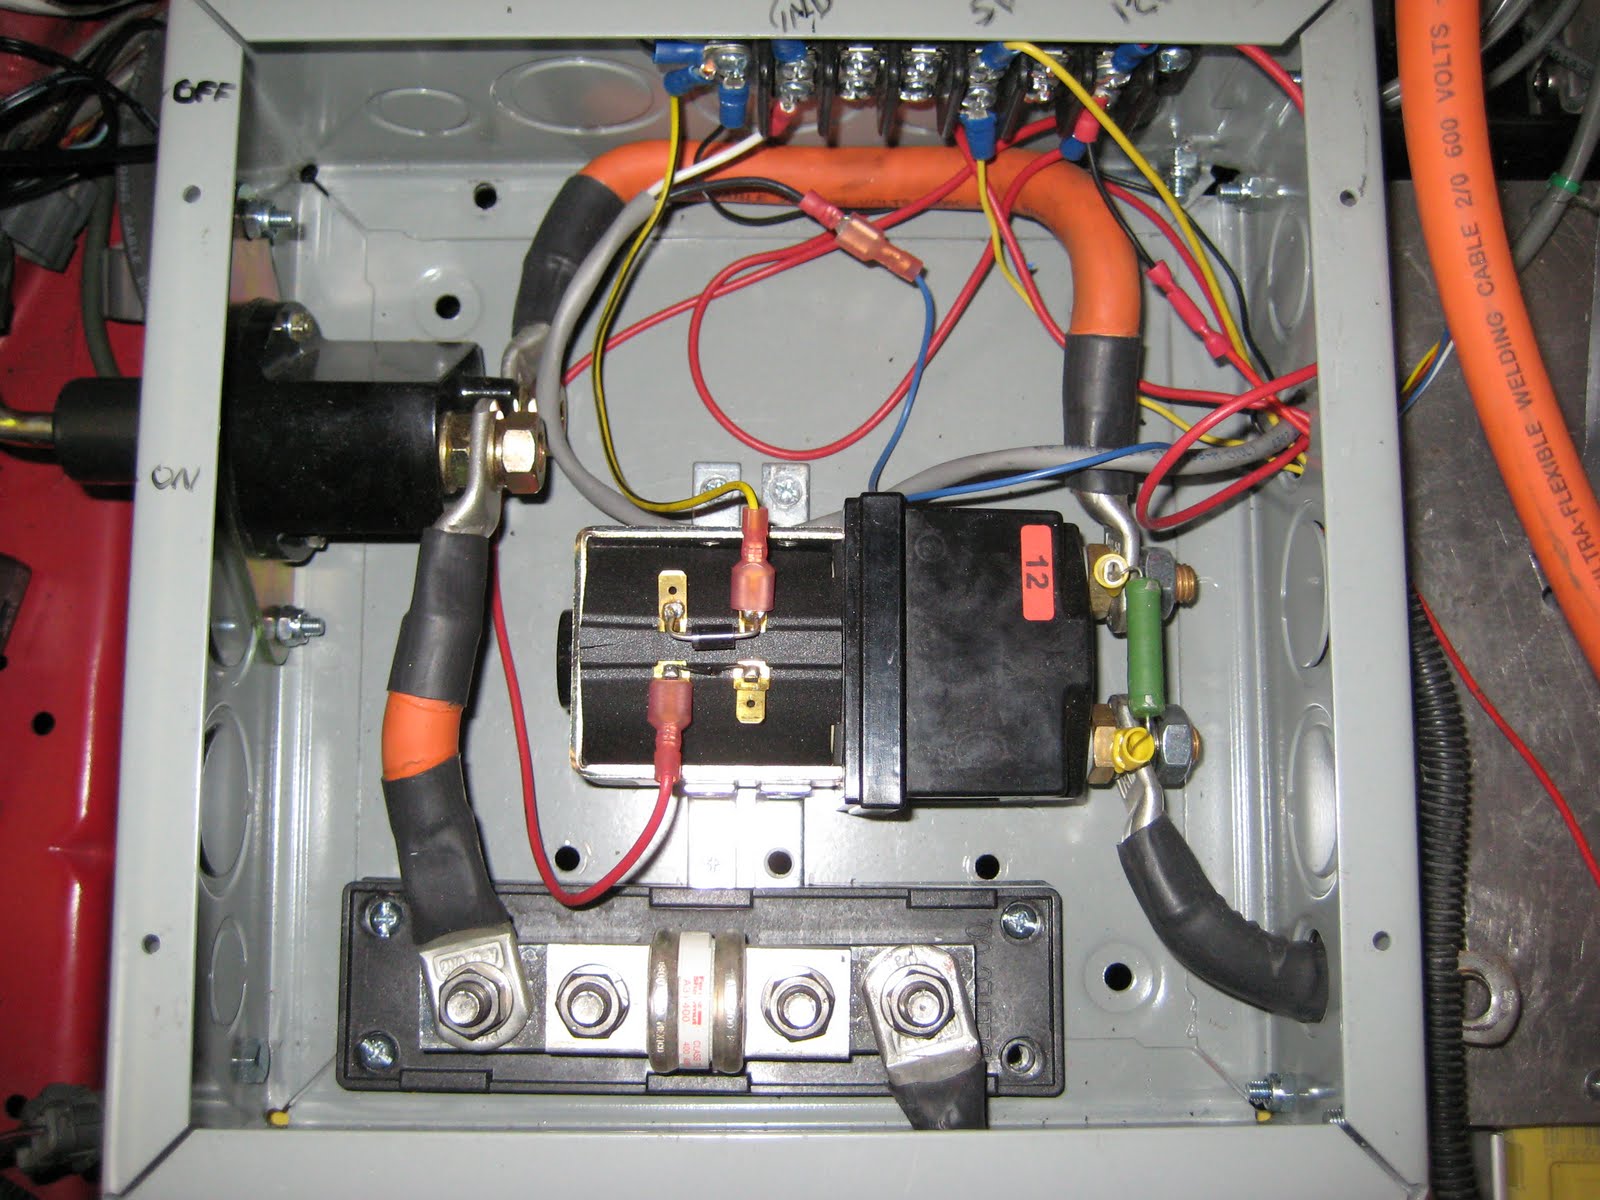
The control box is starting to take shape. I picked up a wiring box at home depot and have been drilling holes in it for 2 days. I've found a good place to mount it just above the transmission. The controller will mount off of the side of it. Once I get everything bolted down I can start wiring it.

Tuesday, July 14, 2009

EVs in the hood

It turns out that the neighborhood I live in is a hot bed of EV activity. An engineer for the Barefoot ATV lives nearby. I drove one today, very nice. It has really smooth accelerating and has aggressive regen so it stops almost without braking.

Last week I drove Steve Titus' Solar Bug
, which has a solar panel on the top. It was a sunny day and the 48v panel was producing 3amps, which should recharge the batteries in a few hours after driving a few miles.

Monday, July 13, 2009

Potentiometer

I've installed the potbox in about the same place as the last car. It was more manageable to attach it directly to the firewall than near the controller or heatsink. Plus the accelerator cable was much shorter on the del Sol than the older civic. Notice the remnants of the wiring harness. I'll wrap that in some plastic cable wrap to protect it.

Friday, July 3, 2009

Wiring harness


This manual has good wiring diagrams of the '93 del Sol. Along with tips from this blog Open Source Civic EV Kit: Figuring out the wiring harness I was able to get the backup lights working. Testing the speedometer will have to wait until it is drivable. Ironically, the "check engine" light is now on. So, I'll have to remove fuse #15.

Wednesday, July 1, 2009

Motor mount


Using a grinder I cut a channel for the motor mount plate. The plate is 1/8" steel. There are 2 mounting holes on the auxiliary side of the motor.


Tuesday, June 30, 2009

Motor installed

Since the coupler and single plate setup is so simple the installation was really easy. I had to cut 1/4" off the motor shaft with a hack saw and I used a grinder to cut 1" off the drive shaft. Tony warned me about going really slow so the shaft didn't heat up and damage the bearings. It took about 2 hours. But, I got a lot of work done on the motor mount waiting for the shaft to cool.

Zach and I slide the motor under the frame with the front end on jack stands. We used a cable hoist suspended from the garage rafters to lift the motor into place once the coupler and plate were mounted. Because the transmission only has 2 mounts we put the jack under the adapter plate to level the motor for a test spin. I expected that wiring the motor for CCW would be correct... but I was wrong. The wheels spun backwards in first gear. The FB1-4001A can be wired for either direction so the jumper can just be switched.

Monday, June 29, 2009

Coupler and Adapter plate

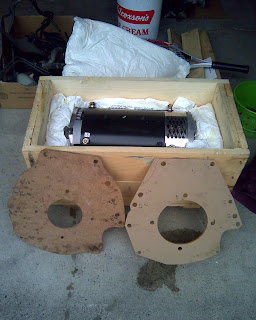
The coupler and adapter plate are done and ready to be installed. I'll have to cut the drive shaft and maybe the motor shaft to get them to fit together. Tony Smith did the machine work and I would highly recommend him again. The plate is 1" to get around any future movement from spacer rings and the clutch splines have been welded on to a keyed coupler that fits the motor. This will eliminate almost all the weight from the flywheel, clutch and pressure plate of the original setup. According to EV America, every 7 lbs taken off the flywheel equals 100 lbs. of vehicle weight. So, that should be about equal to 600 lbs. Nice!


Friday, June 26, 2009

Motor

Motor choice

The information I have wrestled with the most is from the evparts.com site, http://www.evparts.com/img/mt2114peakmotoroutput.PDF

This basically shows that at 120v and 400 amps, which is low for racing but high for a range minded vehicle:

Motor size T HP
X-91 6" 87 36
L-91 6" 60 42
203-06 8" 63 47
FB1 9" 80 50

The first thing I noted was the torque to hp ratio is highest in the X-91. If I understand torque vs. hp (which I might not) a high torque would provide acceleration but not a great top speed or hill climbing capacity. The next thing to note is that the FB1 has larger torque and hp for the same voltage and amperage. Even without looking at the torque curve, this indicates the FB1 is more efficient. I would like to see this same chart at a more realistic current like 100 amps or 80 amps.

Since the del Sol has these original values:
Torque 98(s) 106(Si) 111(VTEC)
HP 102(S) 125(Si) 160(VTEC)

At 144v and 400 amps (max.) I calculated the torque at 111 ft.lbs. and hp at 68, which actually comes pretty close to the original, only a little shy on the HP. So, the FB1-4001A at $1450 from cloudelectric was a pretty good fit. Also, there were a few folks who have already done this, mitigating the risk factor.

68.72 HP = (400a * 144v * .89 Eff) / 746
111.6 ft.lbs. = (5252 * 68.72 hp) / 3282 rpm (back calculated from the evparts chart above)

Adapter Plate Mock-up

I had a local machine shop laser cut a mock-up of the adapter plate in acrylic from a design on the net. It took about 10 minutes and cost $32. There are 2 holes off and the basic outside template shape is way off, but with a little cutting it fits. I'll use the outside shape of the old template and the holes of the new one to build the adapter plate from a 1" alum. plate of 6061, which should eliminate the need for spacers.